.png?width=2000&height=500&name=Compliancy%20Group%20logo%20(3).png)
Settings Module Overview
The Settings Module provides Organization Team Members with the tools to manage core administrative functions, including Team members, Locations, Groups, Trust Badges, Employee Portal settings, and more.

Where applicable there is an Account and Billing tile within the settings module. More information on this feature can be found here: Accessing and Managing Billing.
Table of Contents
Team
The Team in The Guard are the individuals who will have access to manage The Guard's Modules and Data.
To add new Team Members:
- Navigate to Admin > Team
- Select Invite Team Member and fill in the form that appears
Title Dropdown
Offers the ability to assign a Team Member a title that reflects their responsibilities. The main categories include IT, Clinical, HR, Compliance, Executive, Finance, Safety, Practice, and Other, each containing specific titles relevant to that category.
Roles
Roles define the scope of a Team Member’s capabilities. Select one of the following:
-
Contributor
-
Can create and edit content only within their assigned locations and modules.
-
May view assets and content in their permitted modules only if the asset’s location designation matches their assigned location permissions.
-
May edit only the assets and objects they own (as the assigned owner) or those they personally created.
-
-
Location Admin
-
Has complete view access to anything in their permitted modules, regardless of asset ownership.
-
May edit only the assets and objects with location designations matching their assigned location permissions.
-
-
Org Administrator
-
Has full access to all locations, modules, and settings across the organization.
-
Can manage users, locations, and all other areas,
-
To assign a role:
-
Click the Select button under the desired role.
-
The selected role will be highlighted and marked as chosen.
Locations
Locations restrict or allow a Team Members access to specific physical or organizational sites.
-
All Locations
-
Grants permissions for all current and future locations.
-
-
Specific Locations
-
Select individual locations by checking the box next to their name.
-
Team Member will only have access to content and modules for the selected locations.
-
Modules
Modules determine which areas a Team Member can access. Permissions can be toggled Enabled or Disabled individually.
Compliance Modules:
-
Employees – Manage employee records.
-
Policies – View, create, and edit policies.
-
Learning – Assign and manage trainings.
-
Exclusion Monitoring – Manage and review exclusion monitoring results.
-
Asset Tracking – Manage organizational assets.
Risk & Assessment Modules:
-
Playbooks – Manage and execute playbooks.
-
Programs – Create and manage programs.
-
Standard Reports – Access and generate standard reporting.
Incident Management:
-
Incidents – Log and manage incident reports.
3rd Party Risk Modules:
-
Vendor Management – Manage vendor records.
-
Applications – Log and manage applications
To enable or disable a module:
-
Toggle the switch next to the module name.
-
Use Enable All or Disable All to update the entire category at once.
These features allow organizations to assign the minimum necessary permissions for each Team Member. Location Admin can be used for location-specific managers and Contributor for staff needing limited editing rights. These settings can be reviewed and modified as needed.
Once you’ve selected the role, locations, and modules, selections can be saved by selecting +Invite New Team Member to apply the roles and permissions and send a registration email.
Adding Locations
Selecting the locations tile will populate the option update and edit your organizations locations.
Using the + Add Location button will populate the fields to enter the Location name and address.

If a location needs to be edited it can be selected from the list to make name or address changes. If the location is no longer needed it can be set to inactive after selecting the Location from the list. Move the active toggle to the left and it will change the locations status to inactive.

Hotline and Incident Reporting Portal
The Hotline and Incident Management tile allows the Organization's Team to generate a link for Employees to access and report an Incident. This link is generated per Organization so it can be posted internally and retrieved, if needed.

The Hotline Report Portal, once accessed, contains a form to fill in to make a report:

More information on Hotline and Incident Reporting can be found in these articles: Hotline Reporting and Incident Reporting
Groups
The Organization's Team can manage Groups here to assist with tagging across your Organization.
- Navigate to Admin > Groups
- Select Create Group, then fill out the form to create your Group(s):

Employees can be added to Groups via the People module.
- Navigate to People
- Select the individual needing to be added to a Group
- Select Options in the top-right, then select Edit Profile from the drop-down
- Add the needed Groups in the Groups field, then Save
Trust Badges
Trust Badges can be accessed and the code snippet copied for display on the Organization's website. The Trust Badges are accessible via the Admin Module following the first 24-hours after Org creation in The Guard.
Only relevant Trust Badges will be displayed. If an Organization is not using SOC2 or OSHA content within The Guard, then these Trust Badges will not be displayed or accessible.
Exclusion Monitoring
Where applicable exclusion monitoring tile can be used to enable monitoring for People and/or Vendors. More information can be found in this article: Exclusion Monitoring

Employee Portal
The employee portal tile includes options for turning One Time Passcode and Document Folders in the employee profiles and portals.

One Time Passcode
Admins for an Organization may Enable / Disable One-Time Passcode (OTP) for Employee Portals in the Settings Module. This is done at the org level and cannot be done on an individual basis.
- Enabled (Checked): Employees will have to enter a One-Time Passcode sent to their Email in order to access their Employee Portal
- Disabled (Unchecked): Employees will be able to access their Employee Portals without entering a One-Time Passcode each time
Note: Admins may access an Employee's Portal with OTP Enabled, without having to enter the OTP. To do so, simply view the Employee Portal from the Employee Module.
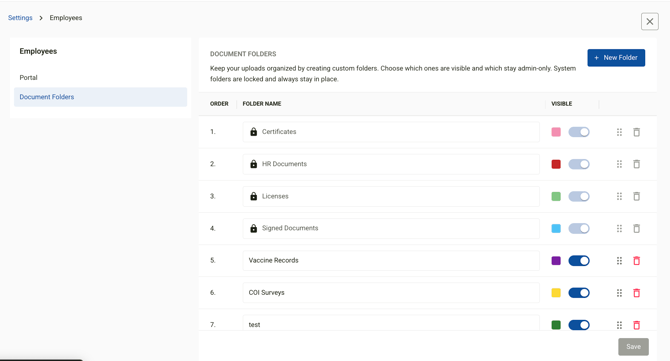
Document Folders
Control how employee profile folders are organized.
- The 4 system folders — Certificates, HR Documents, Licenses, and Signed Documents — are permanent and cannot be deleted
- Custom folders can be created, named, color-coded, and reordered by dragging (Growth plans and above). To create a new folder use the + New Folder button on the upper right hand side.
- The visibility toggle controls whether a folder appears in the employee portal or stays admin-only
Localization
The localization tile can be used to set the time zone for the Guard.

Org Profile
The org profile tile can be used to help tailor compliance guidance for your organization. Completing the details in the available fields can assist with ensuring the system can better understand your organizations compliance needs.